IPAC Infection Control for PSWs: The Complete Study Guide
Infection Prevention and Control — IPAC — is one of the most heavily tested topics on the NACC PSW certification exam. It shows up in scenario questions, knowledge-recall questions, and questions that ask you to choose the correct action in a clinical situation. If there is one topic where you cannot afford gaps in your knowledge, this is it.
The reason IPAC carries so much weight is straightforward: everything you do as a PSW involves close physical contact with clients who may be vulnerable to infection. Whether you are assisting with personal care, handling soiled linens, or taking vital signs, your infection control practices directly determine whether your clients stay safe.
This guide covers every IPAC concept you need to know for the NACC exam, organized in the order that makes the most sense for studying. We will start with the foundational theory (the chain of infection), build through hand hygiene and routine practices, cover PPE in detail, and finish with the specific pathogens and scenarios that show up most frequently on the exam.
The Chain of Infection
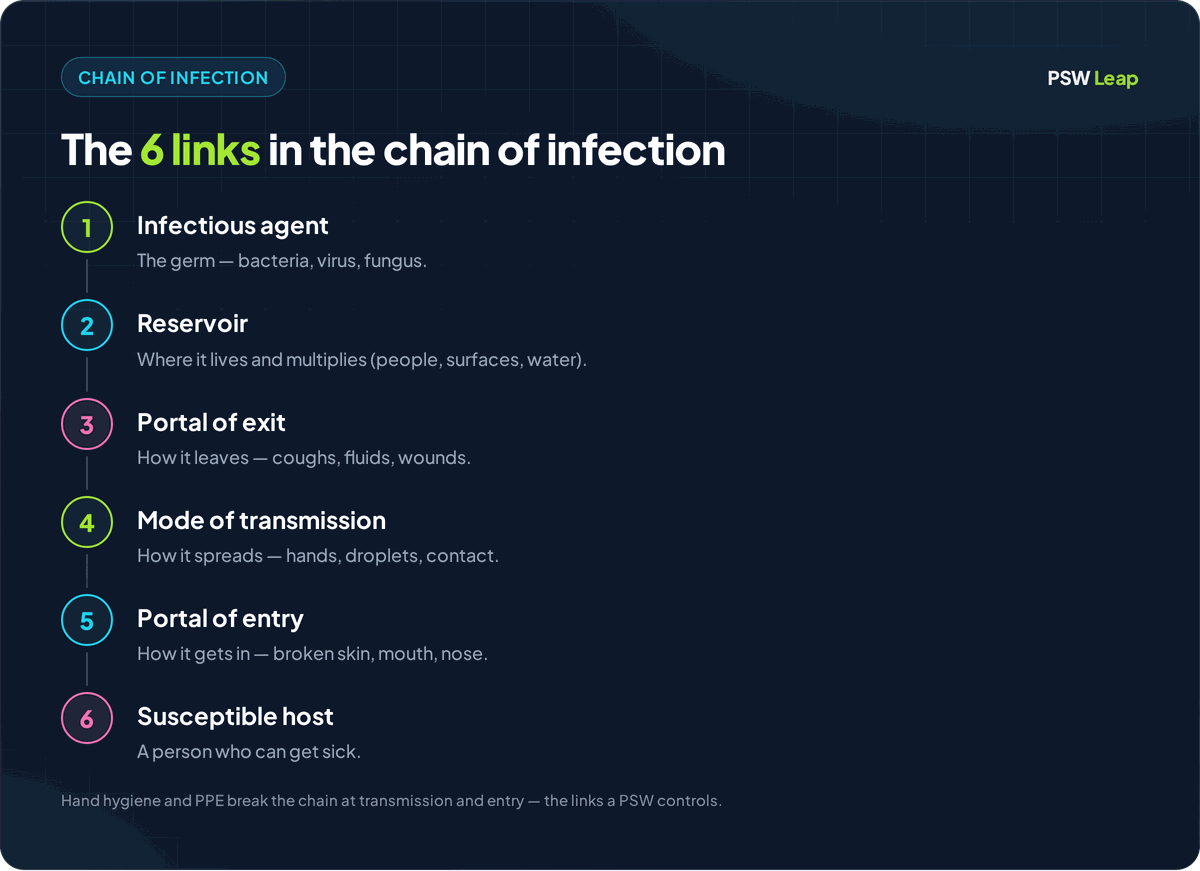
The chain of infection is the foundational model that explains how infections spread. It has six links, and every single one must be present for an infection to occur. Break any one link, and the chain is broken — the infection cannot spread. This concept is the backbone of everything you will learn about IPAC.
The Six Links
-
Infectious Agent (Pathogen): The microorganism that causes the infection. This could be a bacterium (like MRSA or C. difficile), a virus (like influenza or COVID-19), a fungus, or a parasite.
-
Reservoir: The place where the pathogen lives, grows, and multiplies. Reservoirs include people (clients, staff, visitors), animals, water, food, soil, and contaminated surfaces or equipment.
-
Portal of Exit: The path the pathogen takes to leave the reservoir. Common portals of exit include the respiratory tract (coughing, sneezing), the gastrointestinal tract (vomiting, diarrhea), the urinary tract, blood, and open wounds or broken skin.
-
Mode of Transmission: How the pathogen travels from the reservoir to a new host. The three primary modes are contact transmission (direct or indirect), droplet transmission, and airborne transmission. We will cover each of these in detail later in this guide.
-
Portal of Entry: The path the pathogen takes to enter a new host. Portals of entry include mucous membranes (eyes, nose, mouth), respiratory tract, breaks in the skin, the urinary tract, and the gastrointestinal tract.
-
Susceptible Host: A person whose immune system is unable to fight off the pathogen effectively. Factors that increase susceptibility include advanced age, chronic illness, immunosuppression, malnutrition, open wounds, and invasive devices (catheters, IVs).
Breaking the Chain
As a PSW, your job is to break as many links in this chain as possible during every client interaction. Here is how each link maps to your daily practice:
- Infectious agent: Proper cleaning and disinfection of equipment and surfaces eliminates pathogens.
- Reservoir: Maintaining a clean environment, proper waste disposal, and ensuring clients receive appropriate treatment reduces reservoirs.
- Portal of exit: Covering coughs and sneezes, containing body fluids, and proper wound care limits how pathogens leave a reservoir.
- Mode of transmission: Hand hygiene, PPE use, and routine practices block the pathogen's path between people.
- Portal of entry: Keeping intact skin barriers, proper wound care, and aseptic technique for clean procedures prevent pathogens from entering a new host.
- Susceptible host: Encouraging proper nutrition, hydration, rest, and vaccination helps strengthen the host's immune defenses.
For the NACC exam, you should be able to identify each link in the chain and describe at least one intervention that breaks it. Scenario questions often describe a situation and ask you which action would be most effective — the correct answer almost always maps to breaking a specific link.
The 4 Moments of Hand Hygiene
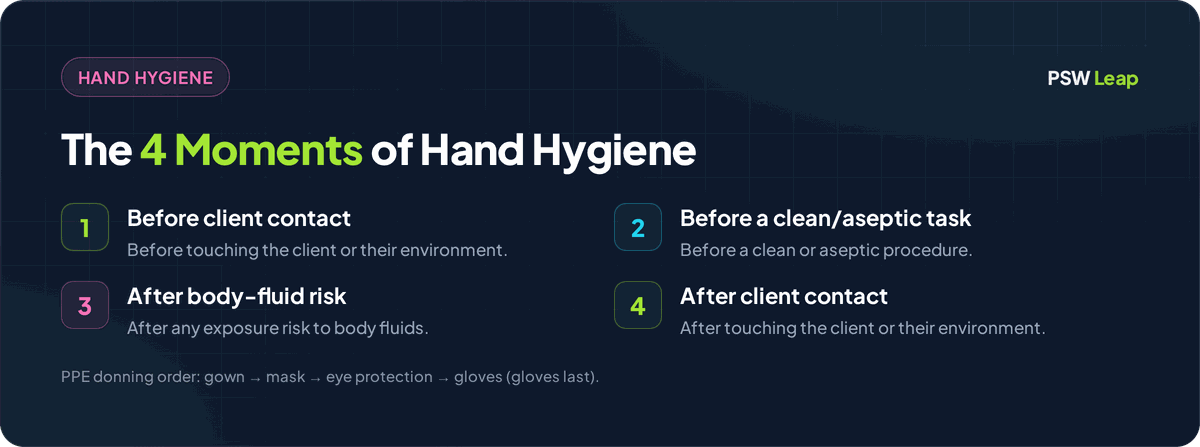
Hand hygiene is the single most effective measure to prevent the spread of infection. The 4 Moments of Hand Hygiene framework tells you exactly when you need to clean your hands during a client interaction. These four moments are non-negotiable — they apply in every care setting, with every client, every time.
The 4 Moments
-
Before initial contact with the client or their environment. This protects the client from any organisms you may be carrying on your hands from previous activities.
-
Before a clean or aseptic procedure. This includes procedures like wound care, catheter care, feeding assistance, or any task that involves accessing a clean body site. Even if you just washed your hands moments ago, you wash again before a clean procedure.
-
After body fluid exposure risk. This means after any contact (or potential contact) with blood, body fluids, secretions, excretions, mucous membranes, non-intact skin, or wound dressings — even if you were wearing gloves. Gloves reduce contamination but do not eliminate it.
-
After contact with the client or their environment. This protects you and the next client. The client's environment includes their bed rails, bedside table, call bell, wheelchair, and any personal belongings you touched.
ABHR vs. Soap and Water
You have two options for hand hygiene: alcohol-based hand rub (ABHR) and soap and water. They are not interchangeable in every situation.
Use ABHR when:
- Hands are not visibly soiled
- You are performing routine hand hygiene between the 4 Moments
- ABHR is the faster, more accessible option (wall-mounted dispensers throughout the facility)
Use soap and water when:
- Hands are visibly soiled (dirt, blood, body fluids)
- You are caring for a client with C. difficile (ABHR does not kill C. difficile spores — this is a very common exam question)
- You are caring for a client with Norovirus
- You have just used the washroom
- Before eating
Proper hand hygiene technique with ABHR: Apply a palmful of ABHR. Rub hands together covering all surfaces — palms, backs of hands, between fingers, fingertips, thumbs, and wrists. Continue rubbing until hands are completely dry (at least 15 seconds). Do not wipe hands on clothing or wave them to dry.
Proper hand hygiene technique with soap and water: Wet hands, apply soap, lather all surfaces for at least 15 seconds (same surfaces as ABHR), rinse thoroughly under running water, and dry with a paper towel. Use the paper towel to turn off the tap and open the door if needed.
Routine Practices
Routine practices are the baseline level of infection prevention applied with every client, in every interaction, in every care setting — regardless of the client's diagnosis or suspected infection status. You do not wait for a confirmed infection to use routine practices. They are your default.
Routine practices include:
- Hand hygiene at the 4 Moments (covered above)
- Point-of-Care Risk Assessment (PCRA) before every client interaction (covered below)
- Proper use of PPE based on the anticipated exposure
- Respiratory hygiene and cough etiquette — covering coughs and sneezes, offering tissues and hand hygiene to clients with respiratory symptoms
- Safe handling of sharps — never recapping needles, using sharps containers immediately
- Environmental cleaning — maintaining clean client care areas and shared equipment
- Proper handling of soiled linen and waste — treating all linen and waste as potentially contaminated
- Safe injection practices — single-use items, proper disposal
The key concept to remember is that routine practices assume every client is potentially infectious, even if they look perfectly healthy. This mindset is what makes routine practices effective.
Point-of-Care Risk Assessment (PCRA)
A PCRA is a quick mental assessment you perform before every client interaction to determine what PPE and precautions you need. It takes only a few seconds, but it is a critical step that many students overlook on the exam.
How to Perform a PCRA
Before you interact with a client, ask yourself three questions:
- What task am I about to do? (personal care, vital signs, feeding, wound care, etc.)
- What is the likelihood of exposure to blood, body fluids, secretions, or excretions?
- What PPE do I need based on this assessment?
For example, if you are about to assist a client with a bath, you anticipate contact with body fluids and wet skin. Your PCRA tells you to wear gloves and possibly a gown. If you are about to help a client with a meal and there is no anticipated body fluid contact, gloves may not be necessary — but hand hygiene still is.
The PCRA also considers the client's symptoms. If the client is coughing and sneezing, your PCRA should factor in the need for a mask and possibly eye protection.
Additional Precautions
When routine practices alone are not sufficient — because a client has a known or suspected infection that spreads through specific routes — additional precautions are layered on top. There are three types.
Contact Precautions
Used for infections spread by direct or indirect contact, such as MRSA, VRE, C. difficile, and scabies.
What this means for you:
- Dedicated equipment for the client (stethoscope, blood pressure cuff, thermometer — not shared)
- Gown and gloves for every entry into the client's room
- Remove gown and gloves before leaving the room
- Hand hygiene immediately after removing PPE
- For C. difficile: soap and water only — ABHR does not kill C. difficile spores
Droplet Precautions
Used for infections spread by large respiratory droplets (produced by coughing, sneezing, talking), such as influenza, pertussis (whooping cough), and some strains of meningitis.
What this means for you:
- Surgical mask required within 2 metres of the client
- Eye protection if there is a risk of splash or spray
- The client should wear a surgical mask during transport outside their room
- No special air handling is required (droplets fall to the ground quickly)
Airborne Precautions
Used for infections spread by tiny airborne particles that remain suspended in the air for extended periods, such as tuberculosis (TB), measles, and chickenpox (varicella).
What this means for you:
- The client must be in an Airborne Infection Isolation Room (AIIR) with negative pressure ventilation
- A fit-tested N95 respirator is required before entering the room (a surgical mask is not sufficient)
- The door must remain closed
- You must perform a seal check on your N95 every time you put it on
N95 Respirator vs. Surgical Mask
This distinction appears on the NACC exam regularly. A surgical mask protects against droplet transmission by blocking large respiratory droplets. It does not form a tight seal against the face, so small airborne particles can get through around the edges.
An N95 respirator filters at least 95% of airborne particles, including very small ones. It must be fit-tested to your face to ensure a proper seal. You use it only for airborne precautions (TB, measles, chickenpox) — never as a substitute for a surgical mask in droplet precautions, and vice versa.
PPE Donning and Doffing Order
The order in which you put on (don) and take off (doff) PPE matters. Getting this wrong can contaminate you, your client, or the environment. The NACC exam tests this sequence directly.
Donning Order (Putting On)
- Gown — Put on first. Tie at the neck and waist. The gown should cover your torso from neck to knees, arms to wrists.
- Mask or respirator — Place over your nose, mouth, and chin. Secure ties or ear loops. If wearing an N95, perform a seal check.
- Eye protection — Put on goggles or a face shield over your mask.
- Gloves — Put on last. Extend gloves over the cuffs of the gown to ensure there is no exposed skin between glove and gown.
Doffing Order (Taking Off)
Doffing is the most dangerous part because your PPE is now contaminated. The order is designed to minimize self-contamination.
- Gloves — Remove first because they are the most contaminated. Use the glove-in-glove technique: pinch the outside of one glove and peel it off, then slide your bare finger under the wrist of the remaining glove and peel it off inside out. Discard immediately.
- Gown — Unfasten ties. Pull the gown away from your body, rolling it inside out so the contaminated outer surface is contained. Discard.
- Perform hand hygiene.
- Eye protection — Remove by handling the headband or earpieces (not the front surface, which is contaminated). Clean or discard.
- Mask or respirator — Remove by handling the ties or ear loops only (not the front of the mask). Discard.
- Perform hand hygiene again.
The memory aid many students use: the order reverses. You put gloves on last, so you take them off first. You put the gown on first, so you take it off second. Hand hygiene happens in the middle and at the end.
Clean vs. Dirty Technique
Understanding the difference between clean and dirty (contaminated) is fundamental to everything in IPAC.
- Clean refers to items, surfaces, or areas that are free from contamination and safe for client contact. Clean supplies, clean linen, a freshly disinfected bedside table.
- Dirty (contaminated) refers to items, surfaces, or areas that have been in contact with body fluids, pathogens, or have not been cleaned/disinfected. Soiled linen, used gloves, a wound dressing that has been removed.
The core principle: always move from clean to dirty, never the other way. When providing wound care, you start at the clean area (the wound itself, or the cleanest part of the wound) and work outward toward the dirtier surrounding skin. When cleaning a room, you start with the cleanest surfaces and finish with the most contaminated.
If you contaminate a clean item or area, you must start over with new clean supplies. Never attempt to "clean off" a contaminated item and reuse it as if it were clean.
Waste Management and Sharps Disposal
Proper waste handling prevents the spread of infection and protects everyone in the care environment.
General Waste Management Principles
- Regular waste (paper, packaging, food waste) goes into regular waste containers
- Biomedical/infectious waste (items contaminated with blood or body fluids) goes into designated biohazard containers — usually yellow bags or bins with the biohazard symbol
- Soiled linen is placed directly into a linen bag at the point of use. Do not carry soiled linen against your body. Do not sort or rinse soiled linen in client care areas.
- Double-bag if the outer bag becomes visibly contaminated
Sharps Disposal
- Never recap a used needle. This is a leading cause of needlestick injuries.
- Dispose of sharps immediately after use into a puncture-resistant sharps container
- Sharps containers should be at the point of use — not across the room
- Do not overfill sharps containers. Replace when the container reaches the fill line (typically three-quarters full)
- If you find a sharp outside of a container (on a bed, on the floor), do not pick it up with your hands. Use tongs or a dustpan, or call for assistance
Common Healthcare-Associated Infections
Several specific pathogens appear frequently on the NACC exam. You should know what they are, how they spread, and what precautions apply.
C. difficile (Clostridioides difficile)
- What it is: A spore-forming bacterium that causes severe diarrhea and colitis
- How it spreads: Contact transmission (fecal-oral route). C. difficile produces spores that are extremely resistant to alcohol and many disinfectants.
- Precautions: Contact precautions. Soap and water for hand hygiene (ABHR does not kill C. difficile spores). Sporicidal disinfectant (bleach-based) for environmental cleaning. Dedicated equipment.
- Key exam point: The soap and water requirement for C. difficile is one of the most frequently tested IPAC facts.
MRSA (Methicillin-Resistant Staphylococcus aureus)
- What it is: A strain of Staphylococcus aureus that is resistant to many common antibiotics
- How it spreads: Contact transmission (direct or indirect). Can survive on surfaces for extended periods.
- Precautions: Contact precautions. ABHR is effective against MRSA. Dedicated equipment. Gown and gloves for client contact.
VRE (Vancomycin-Resistant Enterococcus)
- What it is: A strain of Enterococcus that is resistant to the antibiotic vancomycin
- How it spreads: Contact transmission, often in healthcare settings
- Precautions: Contact precautions. Similar approach to MRSA — gown, gloves, dedicated equipment, hand hygiene.
Key Differences for the Exam
The most important distinction is between C. difficile and the other contact precaution organisms. For MRSA and VRE, ABHR is effective. For C. difficile, only soap and water works. If a scenario question involves a client with C. difficile and asks about hand hygiene, the answer is always soap and water.
IPAC Exam Strategies
IPAC questions on the NACC exam tend to follow predictable patterns. Knowing these patterns will help you answer confidently even when the scenario is unfamiliar.
Pattern 1: "What should you do first?"
When a question asks what you should do first in a care situation, the answer is almost always hand hygiene or put on PPE (after performing your PCRA). If a scenario describes entering a client's room, the first action is hand hygiene before touching anything.
Pattern 2: "Which action prevents the spread of infection?"
Look for the answer that breaks a link in the chain of infection. The most common correct answer involves hand hygiene, proper PPE, or environmental cleaning.
Pattern 3: "The client is diagnosed with [pathogen]. What precautions are needed?"
Match the pathogen to its transmission route, then select the corresponding precautions. Contact pathogens (C. diff, MRSA, VRE) require contact precautions. Droplet pathogens (influenza) require droplet precautions. Airborne pathogens (TB, measles) require airborne precautions and an N95.
Pattern 4: Donning/Doffing Sequence
If the question asks about the correct order, remember: don from clean to dirty (gown, mask, eye protection, gloves) and doff from most contaminated to least (gloves, gown, hand hygiene, eye protection, mask, hand hygiene).
Putting It All Together
IPAC is not a topic you can afford to skim. It shows up in almost every module of the NACC exam because infection control touches everything a PSW does. The good news is that the concepts are logical, the sequences are learnable, and the exam tends to reward students who understand the "why" behind each practice.
Here is a summary of what to prioritize for your exam preparation:
- Memorize the chain of infection — all six links, and at least one way to break each one
- Know the 4 Moments of Hand Hygiene cold — these are guaranteed marks
- Master the donning and doffing order — practice saying it out loud until it becomes automatic
- Understand when to use ABHR vs. soap and water — especially for C. difficile
- Know the three types of additional precautions and which pathogens go with each
- Understand the difference between N95 and surgical masks — and when each is required
- Practice PCRA thinking — before every scenario question, ask yourself what PPE you would need
If you want to test your IPAC knowledge with practice questions that mirror the NACC exam format, try our free PSW practice questions. For a broader study strategy that covers all 12 modules, read our complete guide to passing the NACC exam.
IPAC is one of those topics where solid preparation translates directly into marks on exam day. Learn it well, and you will walk into that exam with a significant advantage.
Written by Shashank Jha
Founder, PSW Leap
Shashank Jha is the founder of PSW Leap. He built this platform after going through the NACC exam prep process himself, to help fellow students study smarter with practice questions mapped to every NACC module.
Learn more about PSW LeapPSW Leap
Practice smarter for the NACC exam. 2,400+ questions. Detailed rationales. $29.99 one-time.
Try it now →