Vital Signs Normal Ranges for PSWs: Complete Reference Guide
Taking and interpreting vital signs is one of the most important clinical skills you will use as a Personal Support Worker. Vital signs tell you what is happening inside a client's body — they reveal early warning signs of deterioration, track the effectiveness of treatments, and guide your reporting to nurses and supervisors. On the NACC exam, vital signs questions appear consistently across multiple modules, and they are among the most straightforward marks you can earn if you know your normal ranges.
This guide covers every vital sign you need to know for the NACC exam and for your clinical practice. For each vital sign, we will cover what it measures, normal adult ranges, how to take it correctly, what abnormal findings look like, common measurement errors, and when to report.
Quick Reference Table: Normal Adult Vital Sign Ranges
Before we go into detail, here is the reference table you should memorize. These are standard normal ranges for adults. Pediatric and geriatric ranges may differ, and individual clients may have a "normal" that is slightly different from the general population — always compare to the client's baseline.
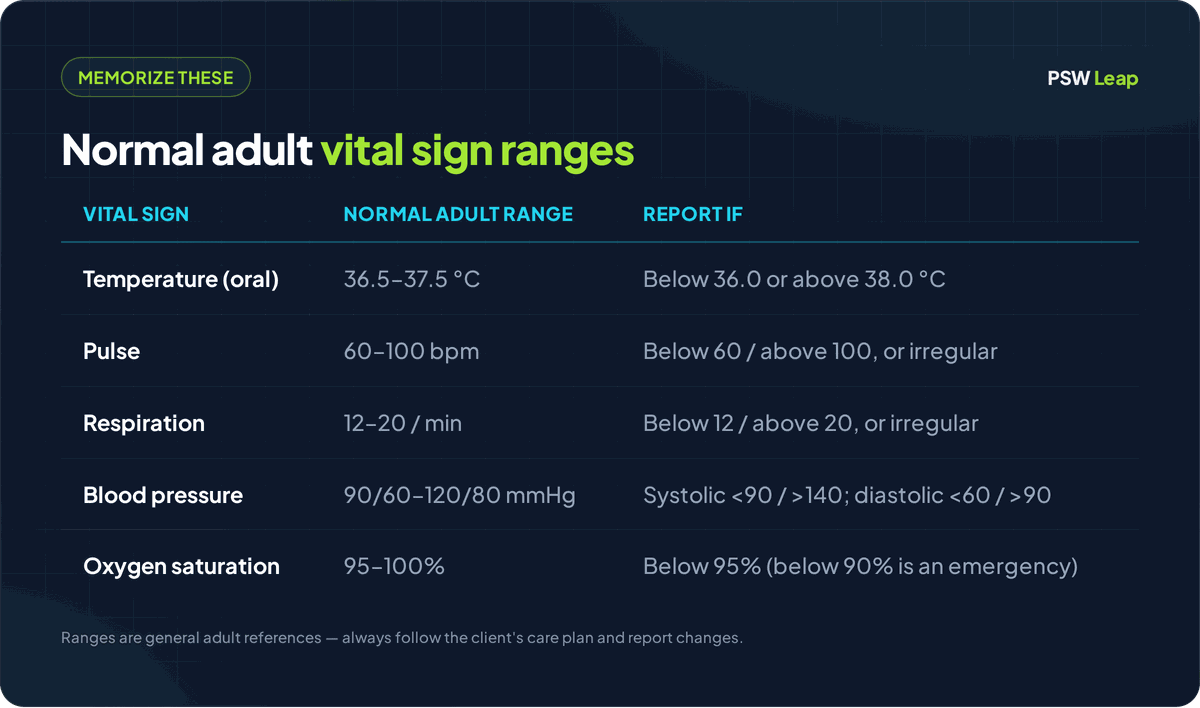
| Vital Sign | Normal Adult Range | Report If |
|---|---|---|
| Temperature (oral) | 36.5 - 37.5 C (97.7 - 99.5 F) | Below 36.0 C or above 38.0 C |
| Temperature (axillary) | 36.0 - 37.0 C (96.8 - 98.6 F) | Below 35.5 C or above 37.5 C |
| Temperature (tympanic) | 36.5 - 37.5 C (97.7 - 99.5 F) | Below 36.0 C or above 38.0 C |
| Temperature (rectal) | 37.0 - 38.0 C (98.6 - 100.4 F) | Below 36.5 C or above 38.5 C |
| Pulse (radial/apical) | 60 - 100 beats per minute | Below 60 or above 100, or irregular |
| Respiration | 12 - 20 breaths per minute | Below 12 or above 20, or irregular pattern |
| Blood Pressure | 90/60 - 120/80 mmHg | Systolic below 90 or above 140, diastolic below 60 or above 90 |
| Oxygen Saturation (SpO2) | 95 - 100% | Below 95% (below 90% is an emergency) |
Print this table or write it out by hand and review it daily until every number is automatic. On the NACC exam, you should not need to think twice about whether a reading is normal.
Temperature
Temperature reflects the body's ability to balance heat production and heat loss. An elevated temperature (fever or pyrexia) often signals infection. A low temperature (hypothermia) can indicate exposure, shock, or serious illness.
Measurement Sites and Normal Ranges
Each measurement site has a slightly different normal range because of how close it is to the body's core:
-
Oral (mouth): 36.5 - 37.5 C. The most common method for alert, cooperative adults. Place the thermometer under the tongue in the sublingual pocket (the area to the left or right of the frenulum). The client should not have eaten, drunk anything, or smoked in the last 15-30 minutes, as these activities affect the reading.
-
Axillary (armpit): 36.0 - 37.0 C. Considered the least accurate method because it measures surface temperature. Used when oral measurement is not safe or practical (confused clients, clients with oral injuries, young children). Place the thermometer in the center of the dry armpit and hold the arm close to the body.
-
Tympanic (ear): 36.5 - 37.5 C. Measures infrared heat from the tympanic membrane, which shares blood supply with the hypothalamus (the body's thermostat). Quick and comfortable, but can give inaccurate readings if the ear canal is blocked by wax or if the probe is not positioned correctly. Gently pull the pinna (outer ear) up and back for adults to straighten the ear canal before inserting the probe.
-
Rectal: 37.0 - 38.0 C. The most accurate method because it is closest to the body's core temperature. Used when the highest accuracy is needed. Rectal temperatures read approximately 0.5 C higher than oral. PSWs should only take rectal temperatures if permitted within their facility's policies and if they have been trained.
When to Report
- Temperature above 38.0 C oral (fever/pyrexia)
- Temperature below 36.0 C oral (hypothermia)
- A significant change from the client's baseline, even if still within the "normal" range
- Client reports feeling hot, cold, or showing signs of chills, flushing, or diaphoresis (sweating)
Common Measurement Errors
- Taking an oral temperature immediately after the client has had a hot or cold drink
- Not placing the thermometer in the correct position (sublingual pocket for oral, center of armpit for axillary)
- Not waiting the correct amount of time for the reading to register
- Ear wax or improper probe angle for tympanic readings
- Using the wrong type of thermometer for the site
Pulse
The pulse is the rhythmic expansion and contraction of an artery as the heart pumps blood. When you measure a pulse, you are assessing three things: rate (how fast), rhythm (how regular), and strength (how strong).
Normal Range
- Normal adult resting pulse: 60 - 100 beats per minute (bpm)
- Tachycardia: Pulse above 100 bpm. May be caused by fever, pain, anxiety, exercise, dehydration, or cardiac conditions.
- Bradycardia: Pulse below 60 bpm. May be normal for athletes, or it may indicate medication effects (beta-blockers), hypothermia, or cardiac conditions.
Radial Pulse
The radial pulse is taken at the radial artery on the thumb side of the wrist. This is the most common site for routine pulse checks.
Technique:
- Place the pads of your index and middle fingers over the radial artery (never use your thumb — it has its own pulse and will give you a false reading)
- Press gently until you feel the pulsation
- Count the beats for 30 seconds and multiply by 2 (for a regular rhythm), or count for a full 60 seconds if the rhythm is irregular
- Note the rate, rhythm (regular or irregular), and strength (strong, weak, bounding, thready)
Apical Pulse
The apical pulse is taken at the apex of the heart using a stethoscope, typically at the fifth intercostal space, midclavicular line (just below the left nipple). It is the most accurate method for measuring heart rate.
Use the apical pulse when:
- The radial pulse is weak, irregular, or difficult to palpate
- The client is on cardiac medications (digoxin, beta-blockers)
- You need the most accurate heart rate for documentation
- Your facility policy requires it
Technique:
- Place the stethoscope diaphragm over the apex of the heart
- Count each "lub-dub" as one beat
- Always count for a full 60 seconds
- Note the rate and any irregularities
Rhythm and Strength
- Regular rhythm: Beats are evenly spaced. This is normal.
- Irregular rhythm: Beats are unevenly spaced, with skipped beats or extra beats. Always report an irregular rhythm and always count for a full 60 seconds.
- Strong/bounding pulse: Easy to feel, may indicate high blood pressure or exercise.
- Weak/thready pulse: Difficult to feel, may indicate low blood pressure, dehydration, or shock.
When to Report
- Pulse below 60 or above 100 bpm (unless known baseline for the client)
- Irregular rhythm
- A significant change from the client's baseline
- Weak or thready pulse
- Client reporting palpitations, chest pain, or dizziness
Respiration
Respirations measure the rate, depth, and pattern of breathing. One respiration equals one complete cycle of inhalation and exhalation.
Normal Range
- Normal adult respiratory rate: 12 - 20 breaths per minute
- Tachypnea: Rate above 20 breaths per minute. May indicate fever, pain, anxiety, respiratory distress, or metabolic conditions.
- Bradypnea: Rate below 12 breaths per minute. May indicate medication effects (opioids), neurological conditions, or impending respiratory failure.
- Apnea: Absence of breathing. This is a medical emergency.
Technique
The most important principle when measuring respirations is that the client should not know you are counting. When people are aware that their breathing is being observed, they unconsciously alter their breathing pattern. The standard technique is to count respirations immediately after taking the pulse, while still holding the client's wrist as if you are still checking the pulse.
- Observe the rise and fall of the chest (or the abdomen in abdominal breathers)
- Count each complete rise-and-fall cycle as one breath
- Count for 30 seconds and multiply by 2 (if regular), or count for a full 60 seconds if irregular
- Note the rate, depth (shallow, normal, deep), and pattern (regular or irregular)
Abnormal Breathing Patterns
-
Cheyne-Stokes respiration: A pattern of gradually increasing depth and rate, followed by gradually decreasing depth and rate, followed by a period of apnea (no breathing). The cycle then repeats. This pattern is often seen in clients who are approaching end of life, or in clients with heart failure or neurological conditions. This is a commonly tested pattern on the NACC exam.
-
Dyspnea: Difficulty breathing or shortness of breath. The client may appear to be working hard to breathe, using accessory muscles (neck and shoulder muscles), or sitting upright to breathe more easily (orthopnea).
-
Stridor: A high-pitched sound during inhalation, indicating a narrowed or obstructed upper airway. This requires immediate reporting.
When to Report
- Rate below 12 or above 20 breaths per minute
- Irregular or labored breathing
- Cheyne-Stokes pattern
- Client reports shortness of breath or difficulty breathing
- Use of accessory muscles
- Noisy breathing (wheezing, stridor, gurgling)
- Cyanosis (bluish discoloration of skin, lips, or nail beds)
Blood Pressure
Blood pressure measures the force of blood against the walls of the arteries. It is recorded as two numbers: systolic (the pressure when the heart contracts) over diastolic (the pressure when the heart relaxes between beats).
Normal Range
- Normal adult blood pressure: 90/60 - 120/80 mmHg
- Hypertension (high blood pressure): Systolic 140 or above, or diastolic 90 or above. Chronic hypertension increases the risk of heart disease, stroke, and kidney damage.
- Hypotension (low blood pressure): Systolic below 90, or diastolic below 60. May cause dizziness, fainting, and falls. Common causes include dehydration, blood loss, medications, and prolonged bed rest.
- Orthostatic hypotension: A drop in blood pressure when moving from lying down to sitting or standing. Defined as a drop of 20 mmHg or more in systolic, or 10 mmHg or more in diastolic, within 3 minutes of position change. This is a significant fall risk.
Technique
Blood pressure is measured using a sphygmomanometer (blood pressure cuff) and a stethoscope, or with an automatic digital device.
Manual measurement basics:
- Position the client comfortably with their arm supported at heart level
- Apply the cuff snugly around the upper arm, approximately 2.5 cm (1 inch) above the antecubital fossa (inner elbow)
- Palpate the brachial artery
- Place the stethoscope over the brachial artery
- Inflate the cuff to approximately 30 mmHg above the point where you can no longer palpate the radial pulse
- Slowly deflate at a rate of 2-3 mmHg per second
- The systolic reading is the first Korotkoff sound you hear
- The diastolic reading is when the Korotkoff sounds disappear
Common Measurement Errors
- Wrong cuff size: A cuff that is too small gives a falsely high reading. A cuff that is too large gives a falsely low reading. The bladder of the cuff should encircle at least 80% of the upper arm.
- Arm position: If the arm is below heart level, the reading will be falsely high. If above heart level, falsely low.
- Clothing under the cuff: Do not apply the cuff over thick clothing. It interferes with the reading and the sound transmission.
- Deflating too quickly: You may miss the systolic or diastolic sounds.
- Talking during measurement: Ask the client to remain still and quiet.
- Not resting before measurement: The client should sit quietly for at least 5 minutes before a blood pressure reading.
- Measuring on the wrong arm: Do not take blood pressure on an arm with an IV line, a dialysis fistula, or on the affected side after a mastectomy or stroke.
When to Report
- Systolic above 140 or below 90 mmHg
- Diastolic above 90 or below 60 mmHg
- A significant change from the client's baseline
- Client reports dizziness, headache, visual changes, or chest pain
- Signs of orthostatic hypotension (dizziness when changing position)
Oxygen Saturation (SpO2)

Oxygen saturation measures the percentage of hemoglobin in the blood that is carrying oxygen. It is measured non-invasively using a pulse oximeter, which clips onto a finger, toe, or earlobe.
Normal Range
- Normal oxygen saturation: 95 - 100%
- Below 95%: Indicates potential hypoxemia (low blood oxygen). Report to the nurse.
- Below 90%: Indicates significant hypoxemia. This is an emergency. Report immediately and stay with the client.
Technique
- Select a finger (usually the index or middle finger) that is warm and has good circulation
- Remove nail polish or acrylic nails if present (they interfere with the reading)
- Place the pulse oximeter sensor on the fingertip
- Wait for a stable reading (usually a few seconds)
- Note the SpO2 percentage and the pulse rate (most oximeters display both)
Common Measurement Errors
- Poor circulation: Cold fingers, peripheral vascular disease, or low blood pressure can give falsely low readings
- Nail polish or acrylic nails: Especially dark colors can interfere with the light sensor
- Movement: The client moving their hand during measurement can produce inaccurate readings
- Bright ambient light: Direct sunlight or very bright room lights can interfere with the sensor
- Carbon monoxide poisoning: The oximeter cannot distinguish between oxygen-bound hemoglobin and carbon monoxide-bound hemoglobin, so it may show a falsely normal reading in carbon monoxide exposure
When to Report
- SpO2 below 95%
- SpO2 below 90% (emergency — report immediately)
- A drop from the client's baseline, even if still above 95%
- Client reports shortness of breath, chest tightness, or confusion
- Cyanosis (bluish discoloration)
Pain Assessment
Pain is sometimes called the "fifth vital sign" because it is assessed alongside the other vital signs during routine client checks. As a PSW, you are often the first to notice a client's pain because you spend the most time providing direct care.
Numeric Rating Scale (NRS)
The most common pain scale used with adults who can communicate. The client rates their pain on a scale of 0 to 10:
- 0: No pain
- 1-3: Mild pain
- 4-6: Moderate pain
- 7-10: Severe pain
Always ask the client to rate their pain in their own words. Record the number, the location, and what the pain feels like (sharp, dull, burning, aching, throbbing). Also note what makes it better or worse, and when it started.
FLACC Scale (For Non-Verbal Clients)
FLACC stands for Face, Legs, Activity, Cry, and Consolability. It is used for clients who cannot self-report pain, such as young children or clients with cognitive impairments. Each category is scored 0-2, for a total possible score of 0-10.
| Category | 0 | 1 | 2 |
|---|---|---|---|
| Face | No particular expression | Occasional grimace, frown | Frequent grimace, clenched jaw |
| Legs | Normal position, relaxed | Uneasy, restless, tense | Kicking or drawn up |
| Activity | Lying quietly, normal position | Squirming, shifting | Arched, rigid, jerking |
| Cry | No cry | Moans, whimpers | Crying steadily, screaming |
| Consolability | Content, relaxed | Reassured by touch or distraction | Difficult to comfort |
PAINAD Scale (For Clients with Dementia)
The PAINAD (Pain Assessment in Advanced Dementia) scale is specifically designed for clients who cannot verbalize their pain due to advanced dementia. It assesses five categories: breathing, negative vocalization, facial expression, body language, and consolability. Each category is scored 0-2, for a total possible score of 0-10.
This scale is important because clients with dementia often experience pain but cannot communicate it. Behavioral changes (agitation, withdrawal, refusal to eat, guarding a body part) may be the only indicators of pain. As a PSW, you are in the best position to notice these subtle changes.
When to Report Pain
- Any new pain the client reports
- A change in the severity, location, or character of existing pain
- Pain that is not relieved by current interventions
- Behavioral signs of pain in non-verbal clients (guarding, grimacing, agitation, withdrawal)
- Pain rated 4 or above on the numeric scale
General Reporting Guidelines
Knowing normal ranges is only half the skill. The other half is knowing what to do when something is abnormal. As a PSW, you do not diagnose or treat — you observe, measure, and report.
What to Report
- Any vital sign outside the normal range
- Any significant change from the client's established baseline
- Any new symptoms the client reports (pain, dizziness, nausea, shortness of breath)
- Any observation that concerns you, even if the numbers are technically normal
How to Report
Use a structured approach when reporting to a nurse or supervisor. Include:
- What you measured (which vital sign, which site)
- The exact reading (not "it seemed high" — give the number)
- The client's baseline for comparison if you know it
- What the client reported (symptoms, complaints)
- What you observed (client's appearance, behavior, level of consciousness)
- What you did (repositioned the client, repeated the measurement, stayed with the client)
When to Report Immediately
Some findings require immediate reporting — do not wait until the end of your shift or your next check-in:
- Temperature above 38.5 C or below 35.5 C
- Pulse below 50 or above 120 bpm
- Respirations below 10 or above 28 per minute
- Blood pressure systolic above 180 or below 80 mmHg
- Oxygen saturation below 90%
- Severe pain (7 or above on the numeric scale)
- Any sudden change in level of consciousness
- Signs of respiratory distress (labored breathing, cyanosis, gasping)
- Chest pain
Vital Signs on the NACC Exam
Vital signs questions on the NACC exam are some of the most predictable and high-yield topics you can study. Here is what to expect:
- Know your normal ranges. If a question gives you a reading and asks whether it is normal, you need instant recall.
- Understand what abnormal findings mean. The exam may describe a scenario and ask what condition is indicated — tachycardia, hypotension, pyrexia, and so on.
- Know when to report. Many scenario questions ask, "Which finding should the PSW report immediately?" The answer is any reading that falls significantly outside normal range or represents a sudden change.
- Recognize common measurement errors. Questions may describe an incorrect technique and ask you to identify the error (wrong cuff size, taking BP on the affected arm, not resting before measurement).
- Understand Cheyne-Stokes respiration. This breathing pattern appears on the exam regularly, particularly in questions about end-of-life care.
For practice questions that test your vital signs knowledge in the NACC exam format, try our free PSW practice questions. For a complete study plan that shows you how to fit vital signs review into your overall exam preparation, read our guide to passing the NACC exam.
Vital signs are not just an exam topic — they are a skill you will use every single shift of your career. Master them now, and you will be a better PSW from day one. For the related topic of infection control when taking vital signs, see our IPAC infection control guide.
Written by Shashank Jha
Founder, PSW Leap
Shashank Jha is the founder of PSW Leap. He built this platform after going through the NACC exam prep process himself, to help fellow students study smarter with practice questions mapped to every NACC module.
Learn more about PSW LeapPSW Leap
Practice smarter for the NACC exam. 2,400+ questions. Detailed rationales. $29.99 one-time.
Try it now →